TGirl Makeup 103 – Lips like Candy
So you’ve got the foundation, you’ve done your eyes, and now you just need to figure out what to do with your lips. No problem, this is the easiest step of them all! ![]() Soon you’ll be strutting down the street like a professional crossdresser :bubbles: Or at least strutting around your bedroom with a pretty face.
Soon you’ll be strutting down the street like a professional crossdresser :bubbles: Or at least strutting around your bedroom with a pretty face.
Ok, down to business. Your lips need 3 things. Lipstick, and . . . and . . . At a loss for the other items? That’s what I was afraid of. If you’ve ever wondered why your lipstick always looks smudged or crooked, or why it looks rough or splotchy . . . it’s because you’re missing two very important steps!
First thing’s first, keep your lips moisturized. Buy chapstick and use it. Just your everyday Blistex or Vaseline lip stuff for everyday when you’re not crossdressing. If you have dry lips, the cracked skin will catch on your lipstick and peel off chunks of color, making your lips look rough and splotchy. You may also want gloss to put on over your lipstick depending on what kind you’re using – gloss is really just chapstick for girls, keeping your lips moisturized and making them shiny. Sometimes it has a little color too, but usually not much. Not suitable for your every day stuff, or you might get some strange looks.
Ok, the second item you need is lip liner. This looks like eyeliner (and really is the same stuff, just in different colors), and is a heavier makeup than your lipstick. It will do 2 things for you – help define your lips, and prevent your lipstick from smearing. “Normally” you would pick a lip liner that matches your lipstick color, but you can get some neat effects by pairing a lighter color (ie pink with red lipstick) or a darker color (ie maroon with red lipstick). Just experiment, as long as the colors compliment eachother.
Now you’re ready to actually put your makeup on. Start with the lip liner and outline your lips. Be really careful with this step as it’s easy to make things lopsided. You want to trace the edge of where your pinkish lip color fades into your regular skin color. Err to the inside unless you have really thin lips, and make sure you have a constant and smooth stroke width. The lines for your upper lip and lower lip should meet at the corners of your mouth, but should not really be connected. And your upper lip has a little “divot” in the middle, so make sure you trace down into that. If you don’t have a divot, or have a really small one, exaggerate a little.
Ok, now get out the lipstick and fill in your outline. You don’t want to put lipstick overtop the lip liner, so stay inside the lines! I keep the point of my lipstick up because I want a fine point to trace the edge of my thinner upper lip as the wider portion of the lipstick fills in below, and then on my lower lip I don’t need fine control along the bottom edge and it just feels more comfortable. Anyway, don’t fuss about filling everything in or getting right to the edge. Just put it on inside the lip liner outline, a little heavier than you think you need to.
Now squish your lips together (with your lip muscles, not your fingers!) and move your upper and lower lips against eachother both in and out and side to side. The idea here is to spread the lipstick around evenly, so don’t go to extremes and spread it off your lips, but you can be fairly aggressive about it. I don’t know why it works, but your lips seem to naturally stop against eachother just right to spread the lipstick everywhere. If you do get a little carried away, use your fingernail to scrape away lipstick in places where you don’t want it.
Ok, last step, add some gloss. And now you’ve got crossdresser lips the gg’s can drool over ![]()
 Here it is! You are privy to the first ever HDR photograph captured of a wild crossdresser in her natural habitat ( <- left). And thanks to the marvels of modern science, you can see it side by side with the exact same pic without the benefit of HDR (right -> ).
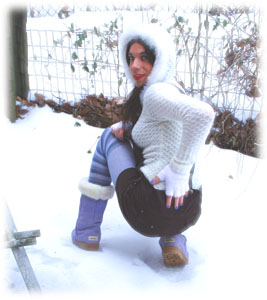 It’s been snowing here for about 4 days now. Well, Cincinnati snow at least. So there’s actually about 1/2″ of snow, then 1/2″ of ice, then another 1/2″ of snow, and another 1/2″ of ice. When you step on it, the layers of ice crack and the sound echoes off all the unbroken snow . . . sounds like a gun going off, it’s crazy loud.
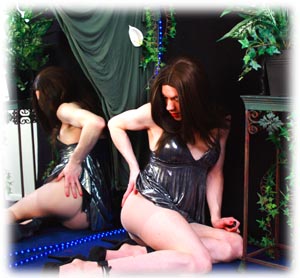
 In a normal photo of a sunset you might capture a nice (or just “ok” as in this case) image of the sky, but everything in the foreground is silhouettes, right? But you remember the scene looking so much better when you were there . . . the bark on the trees, the snow on the limbs, the saturated colors in the sky . . . so what happened when you took the pic?
 HDR imaging takes a set of camera photos at a wide range of different exposures, and combines them using an algorithm that behaves similarly to your eye. So the result is that the picture looks similar to the way your eye might have originally seen things. Like this photo.
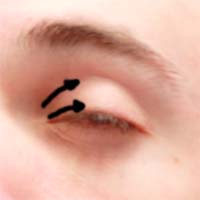 There are 2 primary locations where you want eyeshadow: along the bottom edge of your eyelid, and along the top of your eyelid. You can use the same color in both locations, or you can do color on the bottom and brown or white on top, or two different colors . . . play around with it to get the effect you want. Notice, however, that for most cases there is no makeup above the eyelid (other than what bleeds over from the width of your brush when you follow the top edge of your lid), and there is no makeup below the eye. There are certain special effects that involve makeup in these areas, but unless you’re experimenting or are comfortable with what you’re doing, I would avoid it.
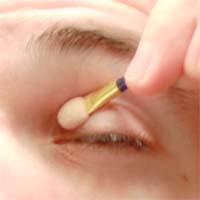 Ok, so pick up some of the lightest color you plan to use and apply it in a smooth one-directional stroke. From the nose outward is easiest I think. Go ahead and follow the full path you want the eyeshadow to follow, but your brush will probably be running dry at the end of the stroke. Pick up some more eyeshadow on your brush and start from the center of your eye and make a stroke outwards to fill in from your last stroke. Grab some more eyeshadow and go back over everything again, blending the separate strokes together.
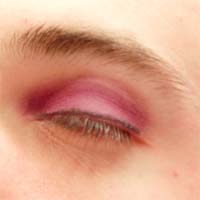
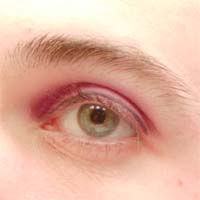
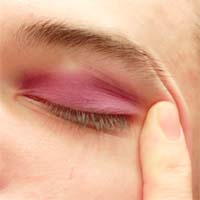 Ok, now time for eyeliner, another tricky task. Eyeliner is (usually) really dark!! That means anywhere it goes, it’s going to show up. So all you have to do is make sure it only goes where you want it to . . . I know, easier said than done if you’ve ever tried before, but you’ll be surprised how easy it really is with this little trick . . . Stretch your eyelid out to the side (see the pic). The idea here is to make the bottom edge of your eyelid taught – pull out all the wrinkles, and keep it from moving under the drag of the eyeliner pencil. Also notice the beautiful two-tone eyeshadow that’s been applied in this photo
  Ok, I know I said it’s easy, but you still have to be careful . . . apply your eyeliner S-L-O-W-L-Y, keep it as close to the edge of your lashes as you possibly can, and don’t worry about using a continuous stroke. It’s much more important to adjust your grip on your eyelid skin with your off hand to make sure it doesn’t start moving or bunching from the drag of the pencil. The eyeliner should be dark enough that you won’t even have to bother blending the different strokes together, so start and stop often, checking your progress as you go.