TGirl Makeup 101 – Foundation
Ok, time for another useful post. Everyone asks me how to do their makeup better, and I’m certainly no expert, but I’ll tell you what I’ve learned over a few years of doing it. And it all starts with foundation (or coverup, same thing).
I’m going to fly in the face of modern dermatology here, but you’re going to want a good thick cream foundation. Everyone these days uses powders or liquids or whipped foundation because they are lighter and let your natural skin color show . . . and they don’t clog your pores. But they also don’t cover up stubble. And I’m not talking about “I didn’t bother to shave this morning” stubble, most modern foundations won’t ever cover “I just shaved 5 min ago” stubble. Unless you are lucky enough to have really fine hair, in which case ignore everything I say.
Don’t fret too much if you need cream coverup, you probably don’t wear it often enough or long enough to worry about clogging your pores – remember most gg’s wear the stuff 12 hours a day every day! The only trick is finding the stuff (and in the right color). Look for makeup in a compact, not in a bottle or jar. And make sure it says “cream”. Neutrogena makes a pretty decent one if you need a place to start looking. Or you can try Ultima II which is available off of Amazon, but it’s a bit light on coverage for a cream.
Colors have semi-standardized names, so you can guess a little bit, but your best bet is to go into a store and compare the color sticker on the package to the skin on your wrist (palm side). You’ll probably want something just a tiny bit darker than your skin if you’re in between shades, otherwise get the closest match. If you’re guessing from the names, here’s a basic guide. “Ivory” is the lightest shade and has little color in it. “Natural”, “Amber”, or “Nude” are light skintones with some color in them (not color as in tan, but color as in more yellow than grey). “Buff” and “Beige” are usually medium tones but with a bit less yellow (leaning towards grey). “Golden” and “Honey” are medium tones with color. “Tan”, “Almond”, and “Cocoa” are exactly what they sound like. And of course there are combinations of the colors like “Natural Ivory”. And then sometimes the colors just make no sense. If you’re just looking at the colors on your computer screen though, err on the light side – most people guess a little too dark, and because your screen is backlit colors will look brighter than they are in real life.
Before you apply your new makeup, take a shower. Seriously. And wash your face, but don’t over-do it – you want to get any dead/dry skin off, but you don’t want to dry your face out and created new dead skin either. Stay in the shower for awhile with pleasantly warm water . . . makes a great time to shave your legs too. Now, if you want great makeup, apply a quick and thin coat of foundation while your face is still damp (not dripping, just damp). The moisture will keep the makeup spread out thin. Go cool off and dry yourself off, letting the foundation set up. Obviously don’t touch your face for a few min or stick it in a towel!
When you’ve got your foundation in hand and are ready to apply it (this goes for the base coat if you put one on, or your “topcoat”), use a sponge or cotton pad – lots of coverup will come with a sponge anyway, which is great. “Brush” in the direction of hair growth as a general rule, unless you find a little hair that you missed when shaving in which case go over it in the opposite direction first and then in the direction of growth. Spread the foundation out thin at first, you don’t want cakes of it, and you can always go back over and add more if you really need. Keep it off your eyebrows and hair, because that just looks funny. Feel free to go over your eyelids and lips though, as that will help keep your eyeshadow and lipstick in place when you apply them overtop the foundation. And don’t forget the little places, like the undersides of your eyes, and underneath your nose. Take the foundation all the way down your neck, but spread it out *really* thin towards the base of your neck – you want it to cover any stubble down your neck, but the color needs to fade out to your natural skin gradually. Don’t rub it in, just gentle strokes in one direction.
That’s it, all there is to it ![]() Ok, that plus a LOT of practice. But you’ll get the hang of it. And don’t worry, it may not look like much, but you’re well on your way to being one hot crossdresser :bubbles:
Ok, that plus a LOT of practice. But you’ll get the hang of it. And don’t worry, it may not look like much, but you’re well on your way to being one hot crossdresser :bubbles:
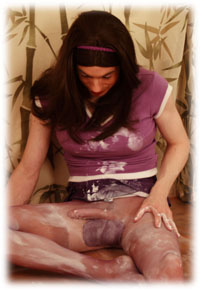 So IÂ got out a big bottle of lotion and started rubbing it in to my pantyhose-clad legs. And by the time I was finished, I had lotion everywhere – I looked like I’d gone swimming in it


 All I could find of the very first design was this photo that happened to include it in the background. Photo is actually part of one of my sets, where I was pretending to be working on the site
  I started to get fancy on this layout . . . I learned a little more about Dreamweaver and just updated everything, so now there’s a continuous border. And I played with Photoshop a bit more and managed to erase a good bit of the background from the layout photos . . . but notice all the photos have big black areas because that was the only way I could get them to blend into my black background!
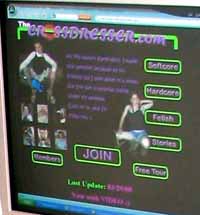
 Now this is not a version of the site I’m proud of . . . as evidenced by the fact that the only image found of it came from an outdated third party review’s screen capture of the members’ area that they still have posted . . . but that’s another subject. Anyway, the tour pages didn’t look quite this bad (I don’t think), but I really have no excuse for re-using the old title banner in a new color scheme. Believe it or not though, this design was a huge improvement in site navigation. Plus I figured out how to get images on the right side of a text block. I still couldn’t get all the background erased from the images in Photoshop though . . . oh well, one step at a time, right?
 Which brings us to a familiar image, the current site design. I’m still fond of this one (introduced in 2007), and I put in a TON of work on it. Not the least of which was (finally) finding a reasonable color scheme. Which is easier said than done, considering that I’m colorblind. Though I don’t think even colorblindness is much of an excuse for some of the original designs. Of course, this layout’s already a bit outdated – I learned an amazing amount this year about how to use Photoshop (and Illustrator) the right way . . . when I did this layout I still couldn’t figure out how to get images in the background that looked natural, and I didn’t know the right compression settings to get the site exported with reasonable file sizes . . . and I didn’t know how to use slices, so I hand cut, saved, compressed, and re-aligned all the pieces. Eek! And of course by the time I did all that I decided I wasn’t going to go back and fix the small issues because it would mean hand re-building everything again!
 Well I’m not ready to give up on the above design, but I did end up putting together a 2008 version which I’m currently using as an alternate tour. This one needs a little tweaking still, but at least the files are set up so that I can do it! Anyway, I like it, but it’s not as clean as the above design either. Maybe they’ll just attract different types of people though
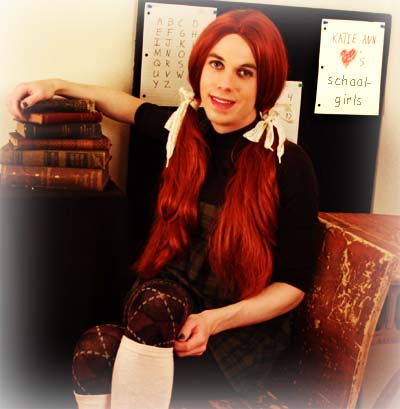
 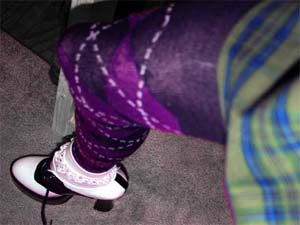 The very best part about the outfit is the shoes! Oh my god, who gets to wear high-heeled saddle shoes?? These shoes are amazing. Ok, they’re a little narrow, but they’re patent leather, they look exactly like the saddle shoes girls used to wear to school when I was growing up (with the exception of the heel